
I use Windows primarily for my development, and though I have used many different IDE’s in the past I am finding myself using the Intell-J IDE’s more and more. For web development, the PHPStorm tool exposes an awesome interface for true RAD (rapid application development).
I manage my own XenServer images on a home server, and up until recently I was using a CentOS image with Apache for web development. PHPStorm allows you to setup deployment parameters, and I had mine set to deploy any codes changes immediately to the CentOS box. With all of the hacking around I do (especially as I am learning a new framework like Laravel) I was finding I was spending too much time fiddling with http.conf, and domain entries in local host files. I knew there had to be a better way.
Of course anyone who has any experience with Laravel knows that homestead can be used as a virtual system for development. It is really quite nice since it has everything all setup and ready to go. Plus pushing a copy of a VM to another developer is dead easy and ensures that everyone is using the same development environment. For me though I act as though I am two developers; 1 at home and 1 at work. I like to be able to continue working on a project (as time permits) without having to spend time administering settings.
The CentOS server setup allowed me to do this since code changes were being pushed to the server as they were being completed on my local computer (whether at home or at work). The issue I did run into was when I wanted to do debugging with the xDebug module for PHP. I didn’t want to install the module on my server and I wanted to have someway to easily enable it or disable it since running things like composer with xDebug turned on is brutal!
So I thought maybe WAMP would get me what I wanted but I have had experience with that and have had issues, I wanted something super easy.. I considered the idea of a simple web server with PHP.. and wouldn’t you know it I didn’t have to go too far before I found out that there is one built into PHP! Ok, how long has that been there… 🙂
This was perfect for what I wanted. It would allow me to run a basic web server locally that could allow me to do local development without all the headaches of setting up an environment if I had 4 or 5 different projects on the go.
My Laravel PHP Web Server Setup
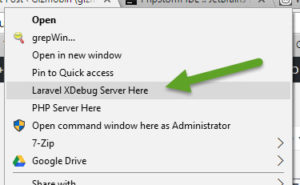
First I thought that I would use a Windows batch file, but then as I copied the batch file into different directories I realized that this was going to be a pain. So I thought about tying the functionality to the right click context menu…
Windows Registry Editor Version 5.00

[HKEY_CLASSES_ROOT\directory\shell\LaravelXdebug]
@="Laravel XDebug Server Here"

[HKEY_CLASSES_ROOT\directory\shell\LaravelXdebug\command]
@="\"C:\\DevApps\\PHP\\php.exe\" -S localhost:8000 -t \"%1\\public\" -c \"C:\\DevApps\\PHP\\php-xdebug.ini\""
Stripping off the escape characters makes the above more readable..
"C:\DevApps\PHP\php.exe" -S localhost:8000 -t "%1\public" -c "C:\DevApps\PHP\php-xdebug.ini"Essentially this right click option (Laravel xDebug Here) is added to the right click context menu. When it is selected the line above is executed.
C:\DevApps\PHP\php.exe is the location of my PHP executable
-S localhost:8000 instruct PHP to run a web server on localhost at port 8000
-t “%1\public” is the designated root of the web server; in this case the folder that is right clicked on plus “\public” which allows me to start the server on the Laravel root
-c “C:\DevApps\PHP\php-xdebug.ini” tells the server to use my custom xdebug PHP.ini file
My xDebug custom PHP.ini file contains the following entries:
; https://xdebug.org/wizard.php - determine which version to use
; "php -i >> php_info.txt" then copy file content to the above form
;
zend_extension = php_xdebug-2.4.0-5.6-vc11-nts.dll

xdebug.remote_enable=1
xdebug.remote_host=localhost
xdebug.remote_port=9000
xdebug.remote_autostart=1
xdebug.profiler_enable=1
xdebug.profiler_output_dir="C:\temp"
xdebug.idekey=PHPSTORM
Note the comments within the above excerpt which describe the details around determining the version of xdebug DLL that will be needed by the running PHP. This is based on VisualStudio build and thread-safe (TS) or not (NTS). This information can be found with phpinfo() but if you (like me) don’t have PHP behind a web server the command line will spit the details into a text file (php_info.txt) for you.
Setup PHPStorm to use the localhost for development, together with xDebug.
Now you can easily test and debug your PHP code!
Update: July 2017
Coming back to this and I forgot how to get the debug to actually work. For “future Robin” and anyone else, this screen shot may be the key to getting everything operational. This is a screen shot of the settings panel in PHPStorm. I had forgotten about items #2 and #3, once those were done I was back in business (together with my updates above).
